Wednesday, January 15, 2014

" Mail Call 4 Happy Mail " ! !

The Documented Life Project has my head spinning, but in a good way. I encourage you to check it our here. 


Each week a new 'challenge' is posted. There is a closed facebook group that  you are able to post photos of your interpretation of the weekly challenge.  
We are on week three and although I have been having a fab time using the private facebook group to be inspired, meet some great people, and share my pages,I do not feel it ok to clog up the photostream with my goings on, so I once again will be back at the blog.  


January 12 Challenge (Week Three) -  Add an envelope from your mailbox. Get creative and add the whole envelope or parts of the envelope.  Journal on it, write notes on it or use it as a pocket!


I posted this on the fb group: "
Week three has my head spinning.......at first I was bummed because I personally do not have fun, pretty or exciting mail. But I am going to take a negative and make it a positive. There are seven days in a week, So, I am going to pick at random 7 U.S. and 7 non U. S. Participants and send them some happy mail. I will be picking these names from our documents page of names and addresses. Check your mailboxes."


 I decorated and mailed out not 14, but 27 pieces of mail all around the world, from Latvia, England, New Zealand, Australia, Canada to the south of my own state, California.
In each envelope I included a  small notepaper that reads ~Create your own Happiness~ A copy of some of my art that I have made or a handmade greeting card. I hope these things bring happiness to people all around the world.


Then I decorated my challenge pages with what I had in my mailbox. I collected the envelopes, studied them intently and created a few pockets and tip-ins. I cut up the envelopes and saved all the 'postal' sayings to add interest.


Next I added a tag listing all the recipients of the happy mail I sent out. If I get something in return, I will include it either here in the pocket, or elsewhere in my planner/art journal.

 I  punched out small envelopes to hold some little notes in the future, Notice the designs are different on the insides.......


The back side of the blue envelope page is decorated with the envelope guts that I punched using a hexagon punch.  I then used postal packing tape to cover the entire thing. It makes it a nice weight now too, as well as holding down all those tiny edges. It kinda reminds me of a quilt, which goes well with the quilting arts front cover.
Who knew there was so much to be found in a pile of bills.
                                           
What do you do with your mail?    
                                           Waiting for week 4....................

Wednesday, September 25, 2013

A Problem......A 10 minute Solution.....And a smartphone!


I have been organizing the Studio ever since it's grand opening   (You know, when my husband moved his desk and workspace to the other room). It seems like there is always something that can be improved to help make things easier to find (or to remember you even have them..)

Todays Challenge hit me when I was figuring out where to put all the colored Sharpies that I had in a cup on my desk. Should I put them in the box with scrapbooking pens that is in the far corner? Should I let them live with the Rubber Stamping pens on the back wall? Would they be easier and more accessible with my bin of journal pens and pencils I use ? 

I KNOW! THEY WILL ALL LIVE TOGETHER, SOLVED. 
But not really, I have this divided box ...ABOVE...that has been looking for a purpose, but as you can see, they do not fit nicely. Ugh! Keep thinking. 


I have this great old Pepsi crate that my daughter gave me, that would work perfectly, except, I already started something with that and don't want to WRECK one thing to make another.   Hmmm, Keep thinking, keep thinking. I need a divided thing with structure.

AhHa! I think I found it.
I happen to have a few advent calendars and do not need this particular one anymore.
I will just take the lovely doors off, drawers out and get organizing.
A 10 minute solution once I figured out what to do.  
I was thinking and reminiscing  about blogging (been away from it for years) and thought to myself, "This would be a cool post."  So I grab the smartphone (because I now have one, finally), make a two second photo area and we will be ready to go.

As soon as I put a blanket on my little dresser, Frodo, the new love of my life,  thought for sure I had made him a new bed. Watson, the hound dog could not care less.  And with a few photos, this post was created.

What are you organizing today? 

Friday, February 17, 2012

Put the Squeeze on it!

I was trolling the aisles of Dollar Tree looking for a project. to keep me busy. I  was out of luck, no inspiration. A couple things did fall into by little hand basket, like this toothpaste tube squeezer,


 but no crafting items.
Upon returning home and putting my tube in place,

 I had a revelation. This would work great on my E6000 tube that is hard to squeeze and always a crumpled wreck.

 It will also help get all my precious sticky out of the tube. Waste not want not.

 Maybe it will help you too.

Wednesday, February 15, 2012

Meet Miss Maddie

I was inspired by some birds I saw while cruising Pinterest. Then while I was out
I found this wonderful southern belle hiding in a corner of a little antique shop. She must have been embarrassed by her dress being so dirty and banged up. I don't blame her.

I scooped her up and took her home.  She got set on a silver dish, then lifted upon a pedestal and of course glued together with E6000. There really is nothing better!


Next I needed to make her colors flow properly. I gave the whole thing a good coating of Frosted glass paint. This is clear but gives it tooth for the next coat to grab on to.
Once dry it was time to base coat the whole thing in an antique white.


 Now for the color. I choose a nice creamy brown (you know, whatever I had in the shelf) and watered it down a bit.


Next It got brushed all over and especially in the nooks and crannys of the whole piece. With paper towels ready, I wiped off the excess brown until I was satisfied with the proper amount showing.


Then she got a few slight gold highlights to add a bit of shimmer. Not too much, just a hint.


The final step was to give her a clear coat of UV Protection sealer. Now she holds her head high and sits in the shop waiting for someone else to find and love her. 


Tuesday, February 7, 2012

He saw the potential.

You know you have raised an optimistic child when they too can see the good and the 'could be' through all the stuff and yuck.
My 21 year old  son has been living on his own for the better part of two years now. He recently had the opportunity to move. He saw the potential and took this new home. However, moving day came at an unfortunate time. The old renter had not removed all their belongings and as soon as Kevin's  things were delivered (dumped) in the new place, he had to be out of town for a few days. My husband & I went in and pulled a 'while you were out' sort of  event.

We cleaned, straightened and moved in a few more goodies.
BEFORE

It was a nice surprise for our son when he arrived to find he had his house in order.


AFTER


BEFORE

CLEAN KITCHEN

AFTER LIVING ROOM


Not too bad for a young person. So glad he can see potential in junky environments. It surely isn't my style, but then again it isn't my room. His room is truly REFRESHED and perfect for him and his dog.

 I am linking to Jennifer Rizzo's 'Refresh your Room Party '

Monday, January 30, 2012

Lost but not Forgotten

I was itchin to make something I saw while glancing  ( OK OK who could ever just glance) at Pinterest.

The idea was emblazened in my to-do head. Kristy from My Pretties had shown what was a school project that I seemed obsessed with.
A lost sock holder! That was it pure and simple. Who dosnt have lost socks? And when you find one how do you know that isn't the one waiting for a mate? Or if you finally find the mate it seems the first lonely one has gone missing. It could go on and on and has in my home for years.
But alas, I SAY NO MORE!
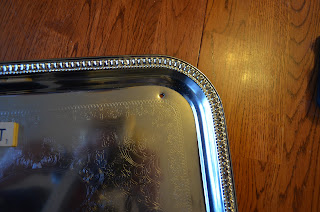
I was not sure exactly how I was going to tackle this project so I looked through the piles of treasures I have collected and found two dollar store trays.

Perfect! Well as soon as holes were drilled in two corners.


Now we needed words, Hhmmm Cricut, Stickers, Chipboard? There are soooo many options.

Again while searching through the Alphabet drawer, I decided on Scrabble letters. Yes, I am getting happy.

Glue Glue Glue.


Next I gave the clothspins a nice little paper jacket to wear. That dressed it up just enough.
Now we are ready for a hanger. What beats Jute?

Wahlaa! No more missing socks. One for me and one to go into the shop.

Now let's see what other inspiration I can find on Pinterest. What will you make?

Friday, January 27, 2012

We all need a little 'Bling'

It is deep winter around here, we are averaging temps in the low 60's. Yes, I live in California and we are not getting the rain we need. So what do you do? Go Shopping for Glass to get the garden looking good.

I decided to create some new artwork for the shop (Vintage Corner in San Juan Bautista, CA) These sold out last year and with spring on the way and our lovely weather, I felt inspired.


This year Tom made me a display system that will handle the revolving inventory.

With the inspiration from a friend to display them in flowers,I came up with the name 'GARDEN BLING'.

I also have the most FANTASTIC SCRAPBOOKING SOFTWARE, (You can try it FREE for 30 days)
so, I was able to go into the garden, set up the 'Bling', take a photo, go back to the computer and make a wonderful catchy sign, print it out and now the display is complete.

I am loving it!

Here is how it looks in the shop. ( must move ladder, oops)

What do you do in the winter months? Where do you have your 'Bling"
Related Posts Plugin for WordPress, Blogger...